Blueprint Designer
- Aki Lähteenmäki (Unlicensed)
- Mikko Juola
- Henri Uusoksa (Unlicensed)
Table of Contents
Overview
Blueprint Designer is a visual data modeling tool that information architects or system admins can use to create and maintain data model blueprints on ServiceNow.
A DCM blueprint consists of
- Blueprint containers, which represent the used classes (ServiceNow tables) in the blueprint.
- Classes are existing tables in the ServiceNow instance.
- Available Classes setup will define which tables are available in the Blueprint Designer.
- Blueprint links
- One-to-many links - meaning 1..n reference fields between the selected classes
- Many-to-many links - meaning n..n relationships between the selected classes
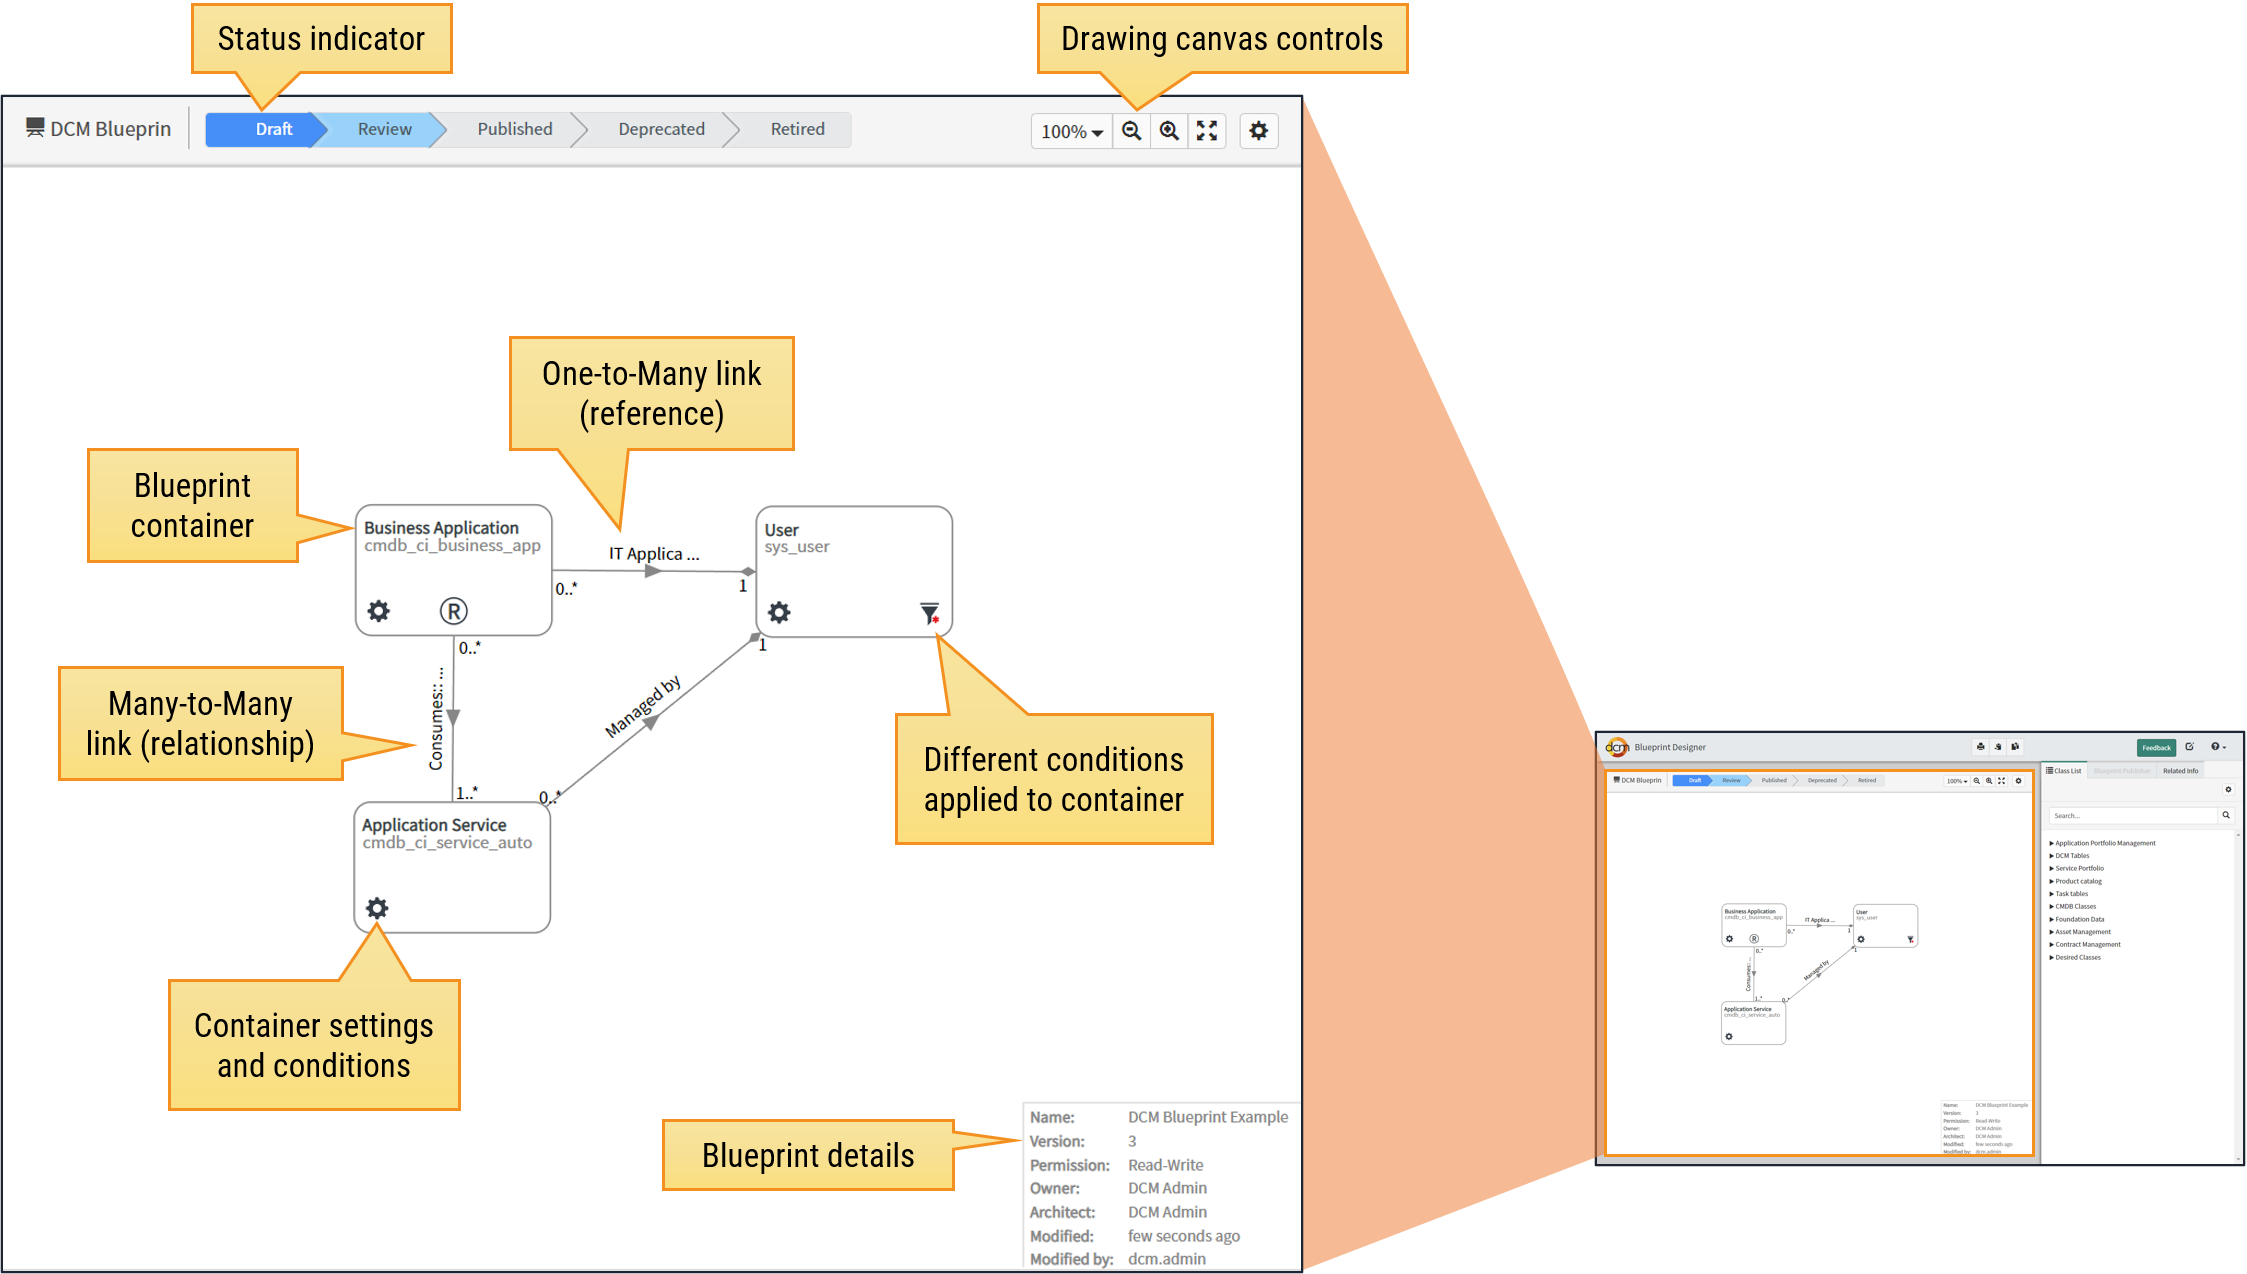
Blueprint containers and links are also known as Blueprint elements.
Users can add new blueprint containers to the blueprint by dragging them from the class list menu...
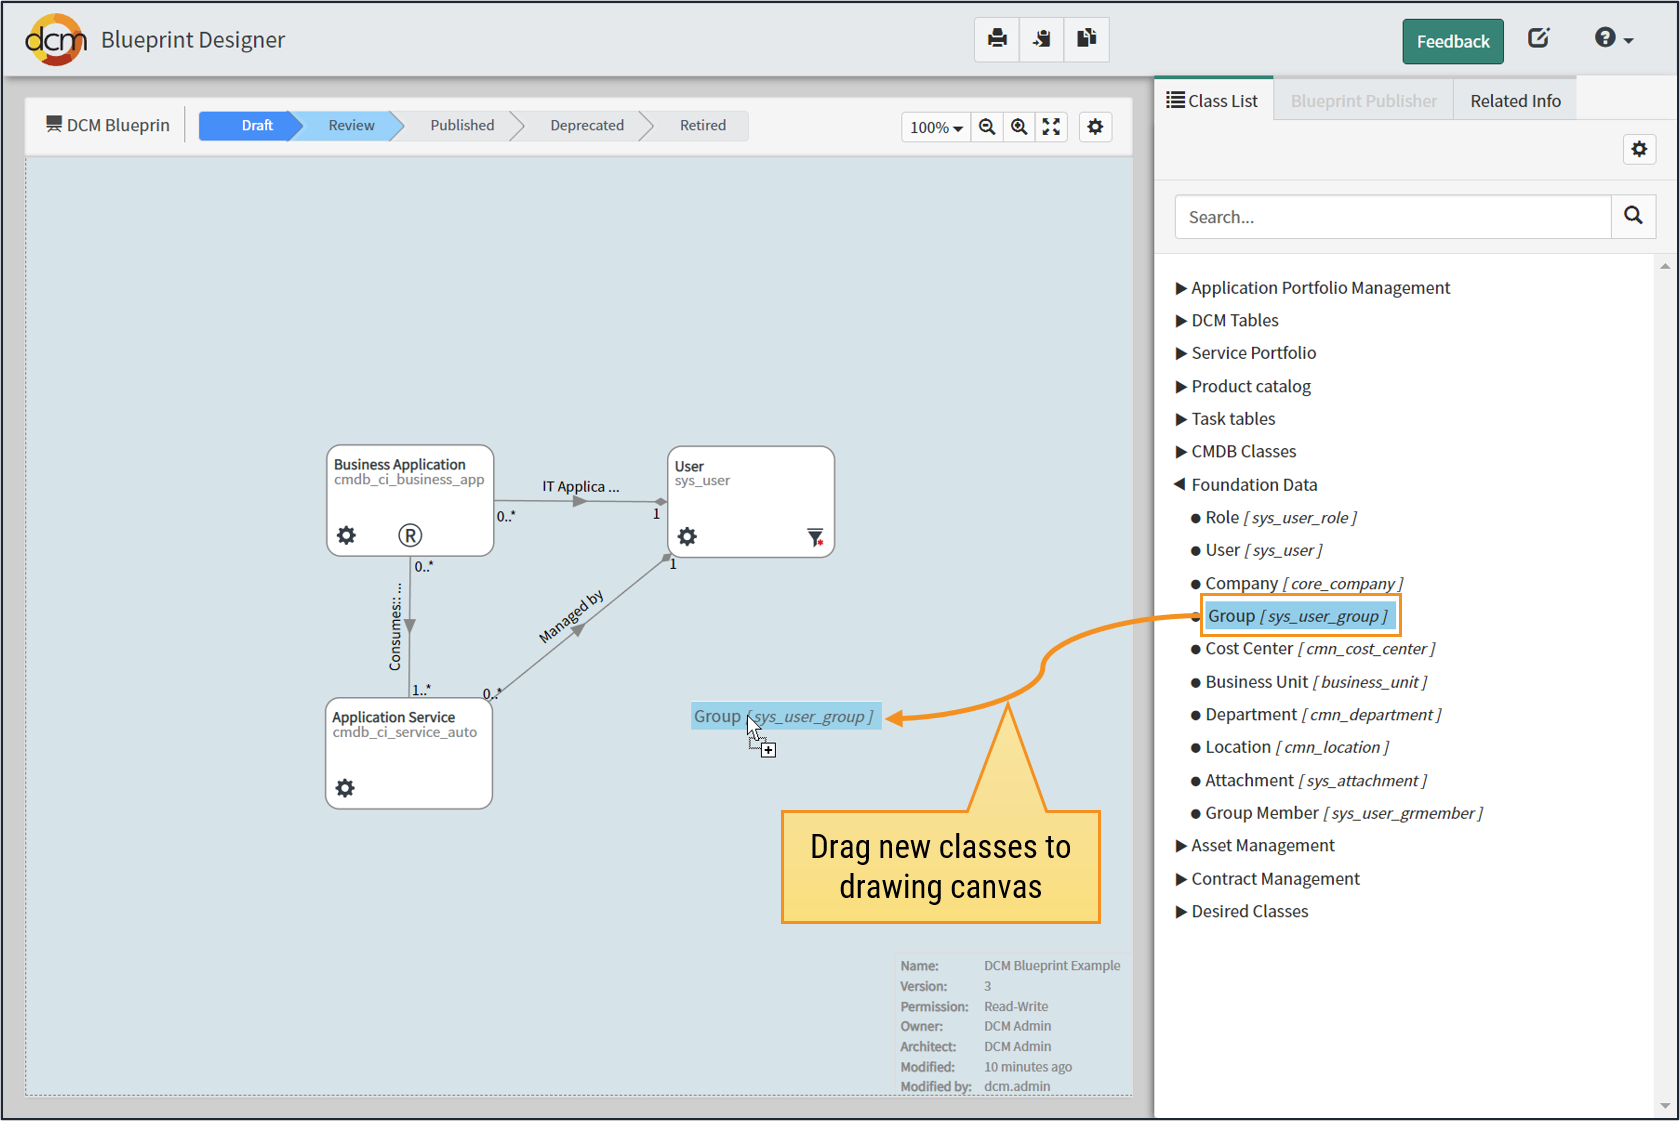
After a new blueprint container is added, the user can define the relationships between the new class and the other classes in the blueprint:
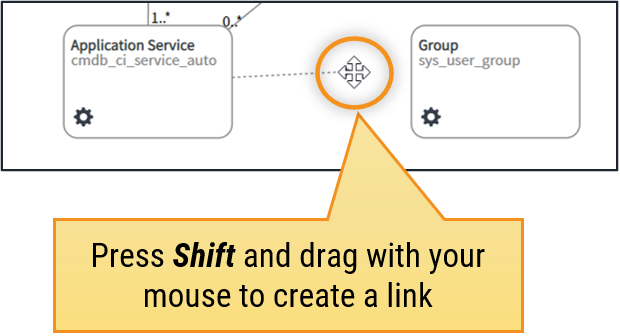
Hint!
Press SHIFT and drag your mouse from the child to the parent container to create a link.
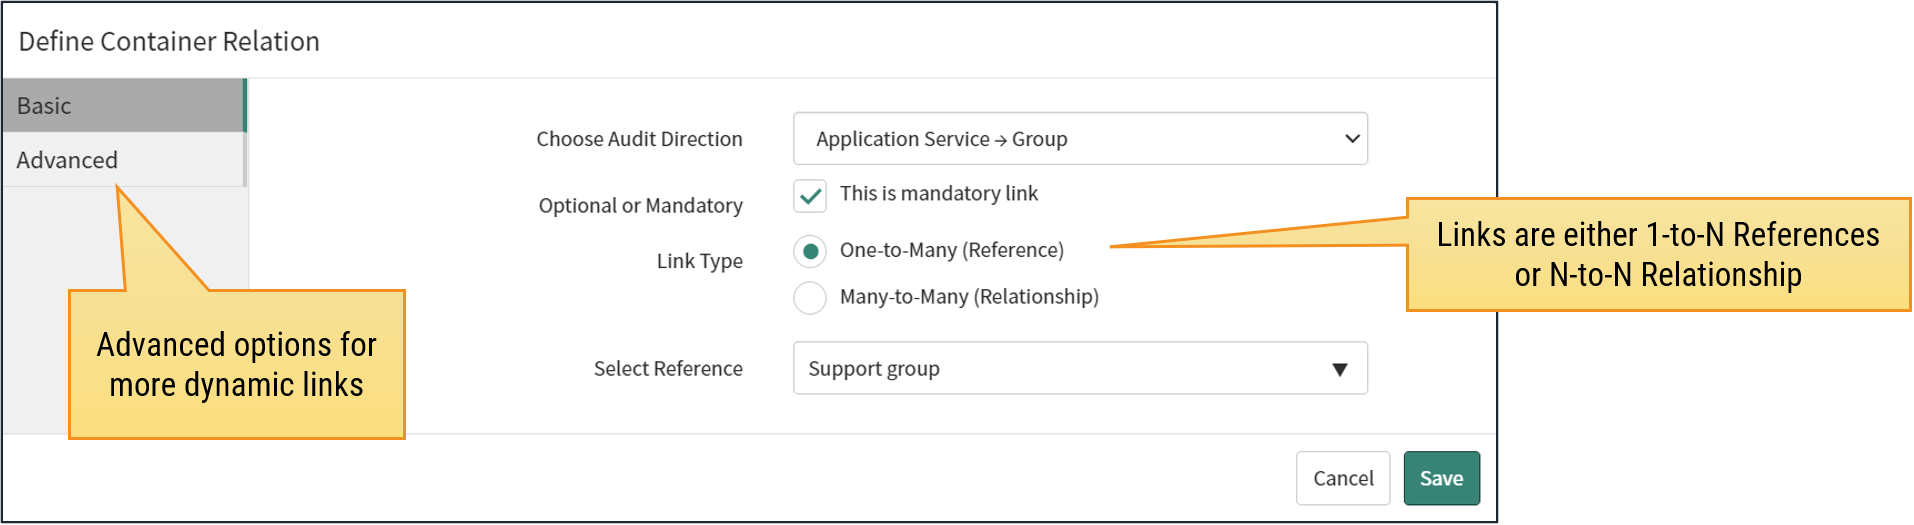
In the Add Relationship window (Define Container Relation), the user can either use
- Basic settings to define a simple link
- Advanced settings to define more complicated and dynamic links
Blueprint lifecycle
The blueprint status indicator bar shows the current status of the blueprint version and the possible next statuses.
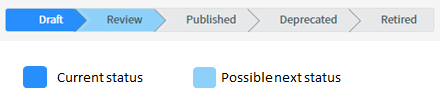
You can change the status by clicking the possible next status (light blue) icons in the status indicator bar.
| Status | Description |
|---|---|
| Draft | Blueprint version planning is in progress. The Blueprint can not be used for data content planning or audits. |
| Review | The Blueprint version is ready and awaiting review, but still not active. |
| Published | The Blueprint version is published and available for data content planning & audits. |
| Deprecated | There is a newer version of the blueprint version available, and this version is deprecated. It can still be used for data content planning and audits. |
| Retired | The Blueprint version is retired and not available for data content planning or audits. |
Note
Only "Published" and "Deprecated" Blueprint versions are considered "Active" and included in the license.
Creating a new blueprint

- Go to the DCM Home and select "Blueprint Designer" or click the Blueprint Designer link from the navigation menu to create a new blueprint:

- In the Create New Blueprint dialog window, give the required details, select a template and click "Create".
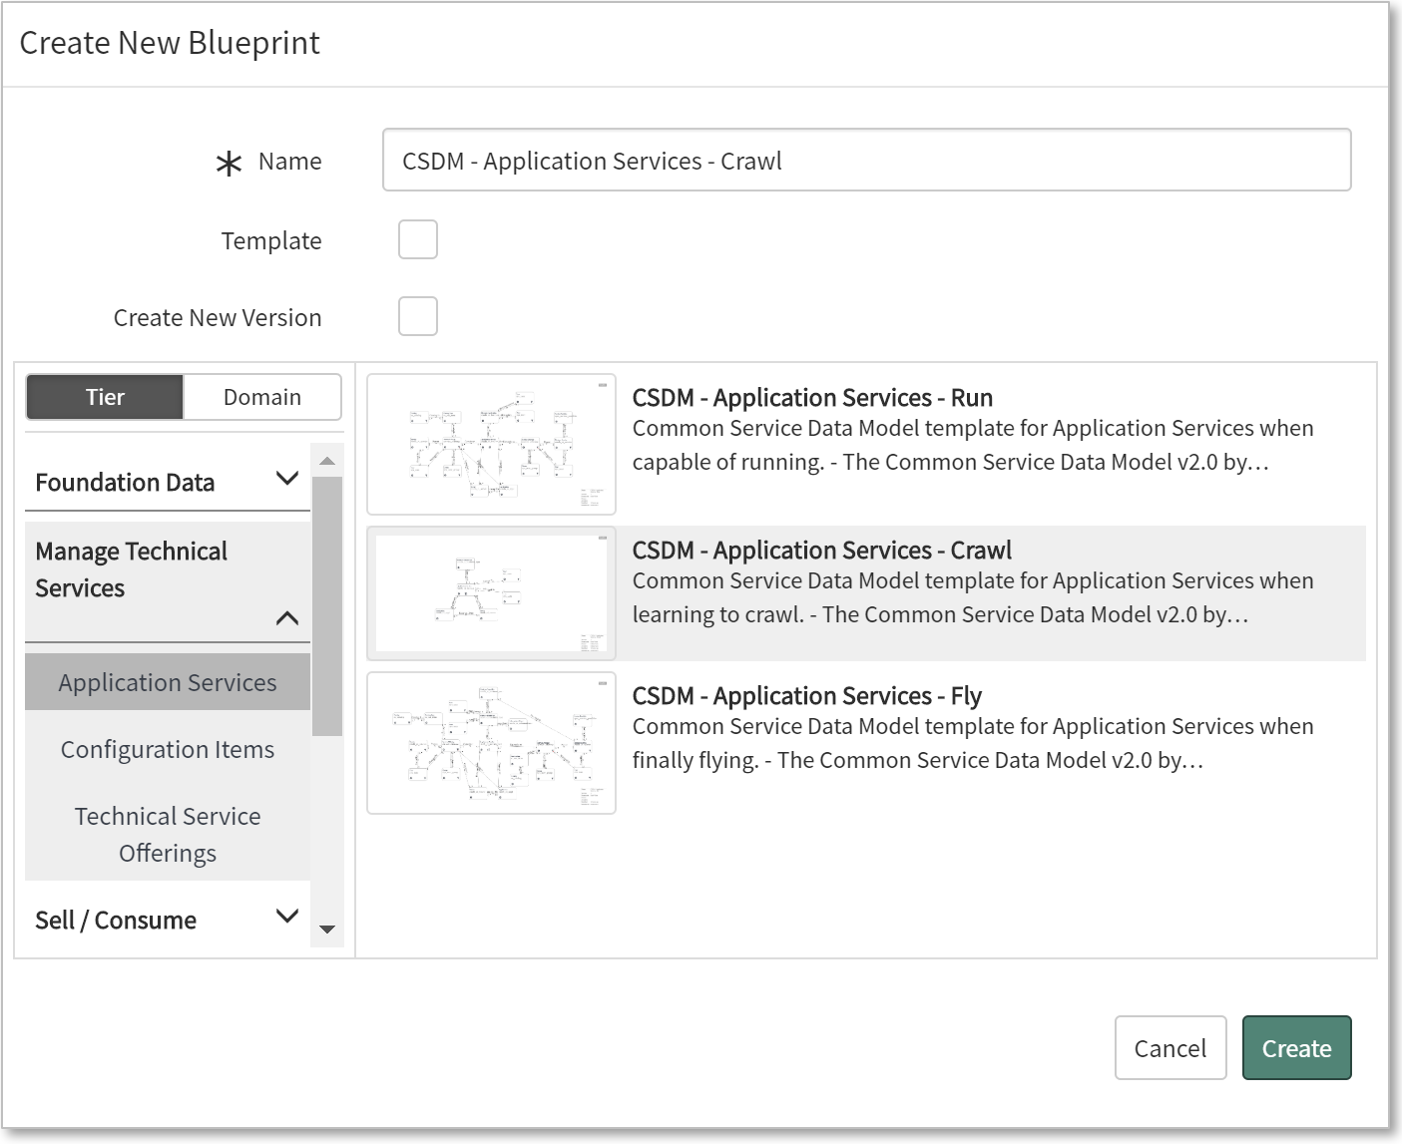
- Select the "Template" checkbox if you want to create a new blueprint template. Keep in mind that templates can not be used for auditing or data content planning. Only for creating new blueprints.
- Select "Create new version" if you want to create a new Blueprint version for an existing blueprint.
- The templates are categorized based on data tiers and domains.
Creating new relationships
Note
Creating and editing relationships has changed in DCM R5.0. A whole new "Edit Relations" modal window has been created to replace the previous wizard-like screens.
The Blueprint Designer can define the relationships between two classes (or containers) in the blueprint.
Press SHIFT and drag from the child to the parent container. In this case, from Application Service to Group.
- For references (1 to many), it's recommended to draw the line from the source container which includes the reference field (usually considered a child) to the target
- For relationships (many to many), it's recommended to draw the line from child to parent, especially for CI Relationships, but you can also change the direction later on
Drawing the line will open up a "Define Container Relation" modal window that includes all settings available for blueprint links.
What's new!
Blueprint Designer also supports Document ID type of fields for One-Many relationship creation.
For many-to-many relationships, the field assignment can be changed (which reference field to relate to each container if multiple matching fields are available)

- In this example, the CI Relationship table has Parent and Child reference fields which both can be assigned to either Business Application or Application Service container.
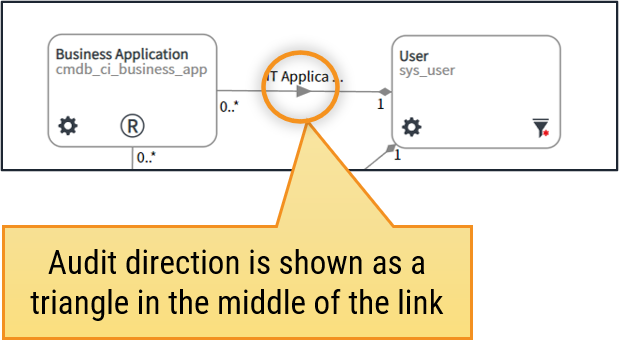
Audit direction selection is required when defining links. And the Audit direction namely defines into which direction the Audit should follow the links.
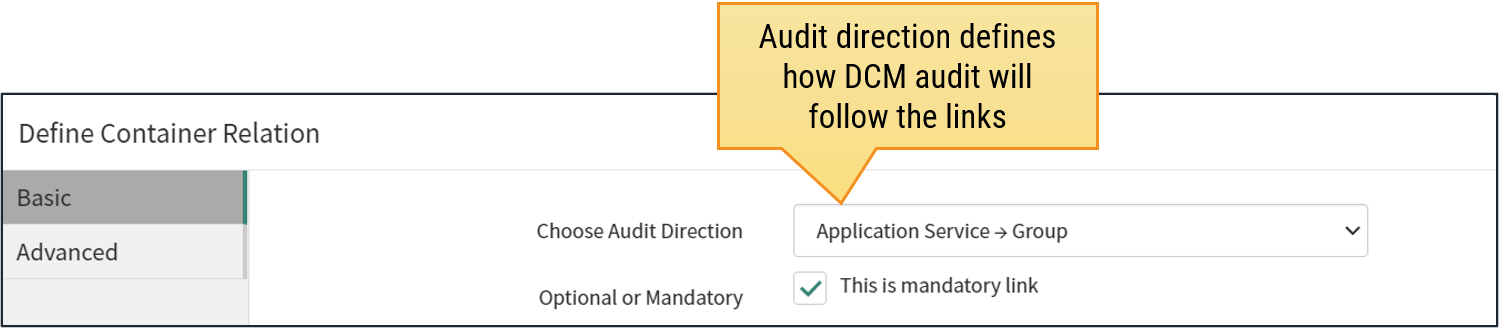
- Audit direction selection is shown as an icon in the middle of the relationship, a "triangle" pointing to the defined direction.
- By default, the audit direction is the same as the direction in which the line was drawn.
Deleting blueprint containers and links
Deleting items from blueprint canvas can be done in two different ways:
- By selecting and clicking the "Delete" key from the keyboard
- By opening the "container settings" from the gear icon and selecting "Delete" from the context menu
Deleting Blueprint Container
- Select a blueprint container you want to delete
- Click "Delete" from the keyboard
- Confirm deletion
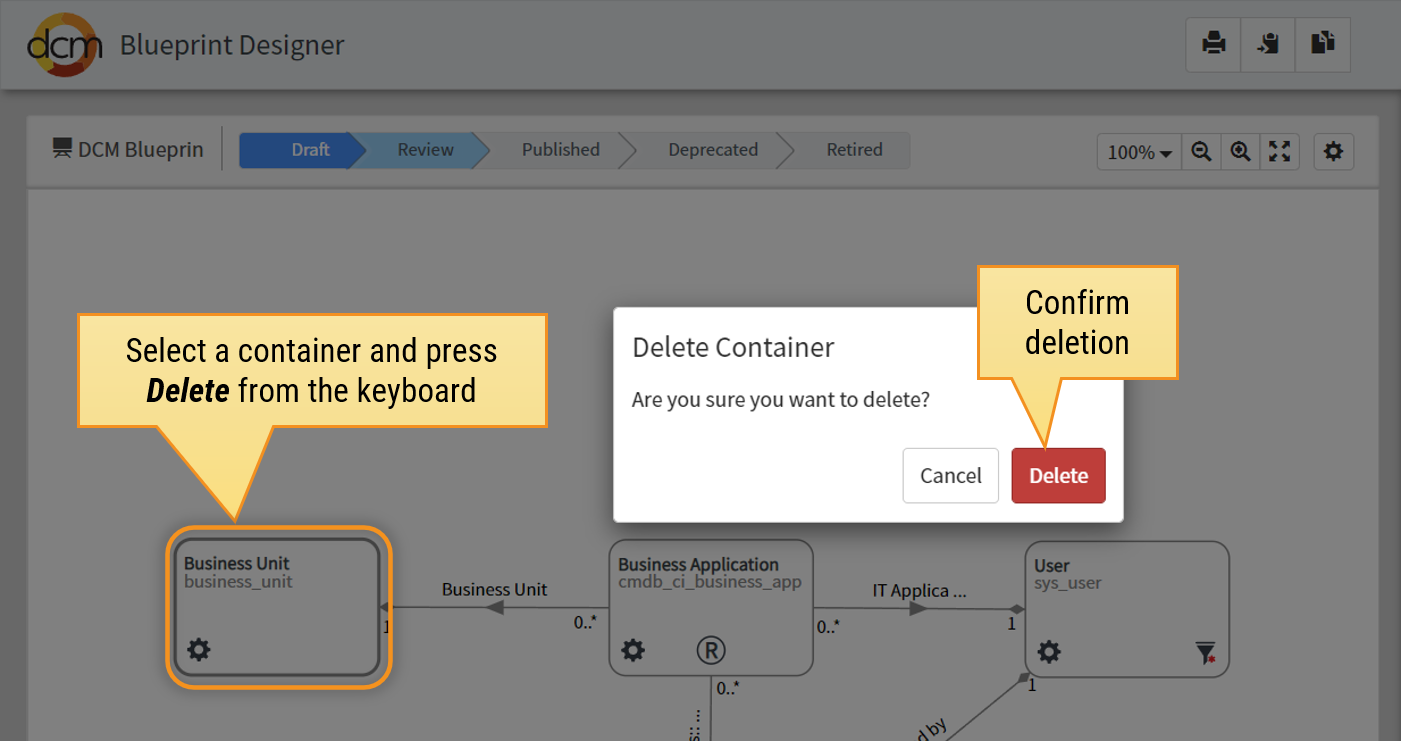
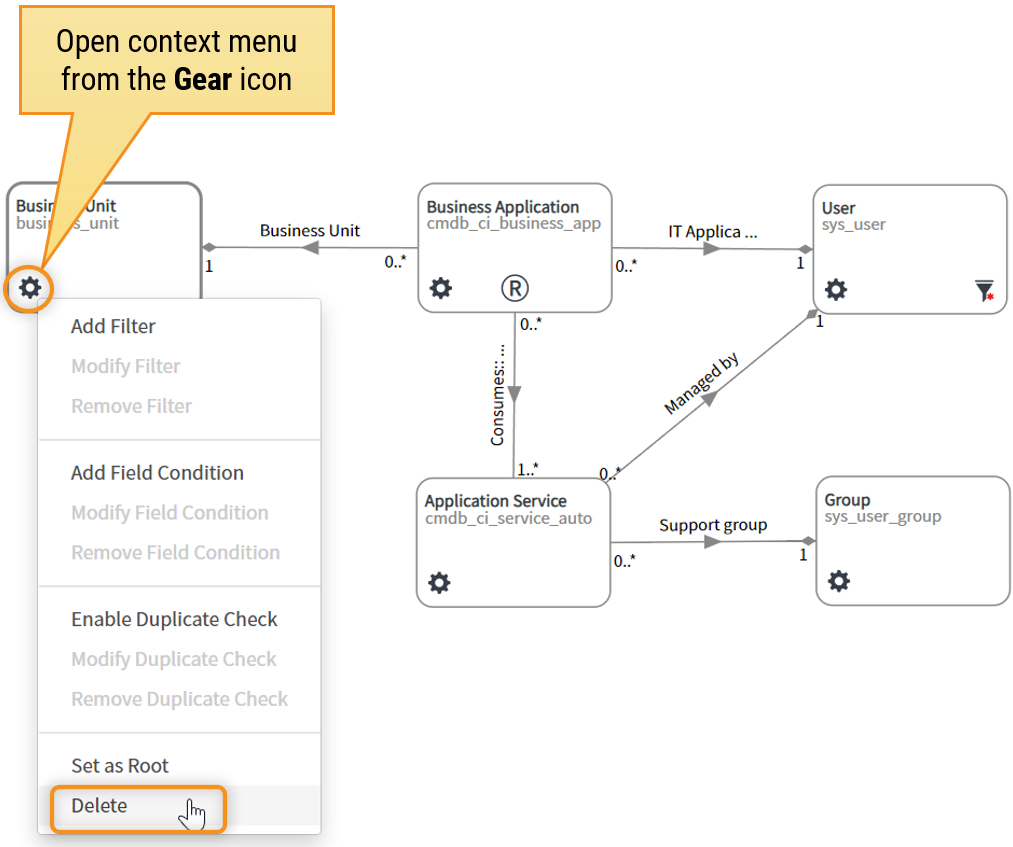
- OR Click the "gear" icon at the bottom left corner of a container
- Select "Delete" from the context menu
- And confirm delete on the prompt
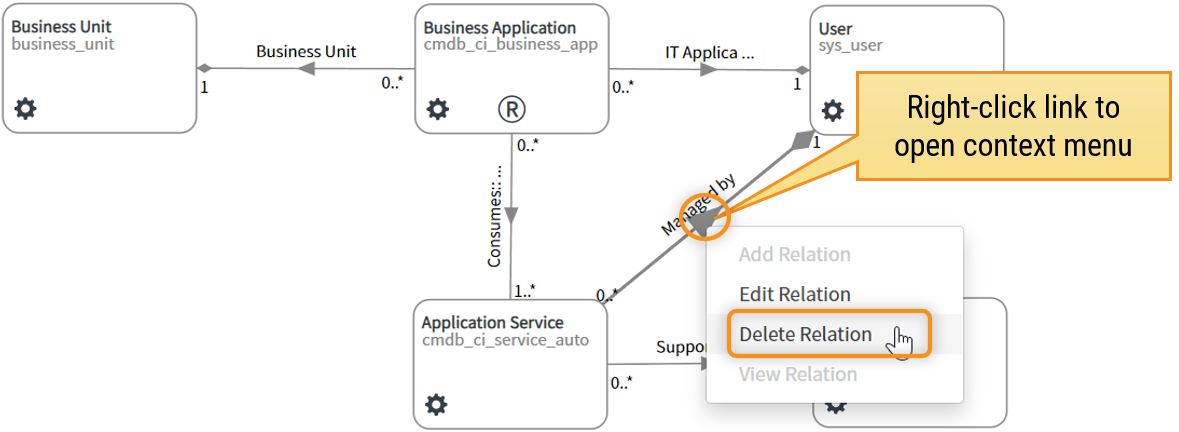
Deleting Links
- Select a link you want to delete
- Click "Delete" from the keyboard
- Confirm deletion
- OR Right-click the link to open a context menu
- Select "Delete" from the menu
- And confirm delete on the prompt
Blueprint container conditions or "model conditions"
You can set the conditions for a blueprint container. The conditions are used by the audit to validate if record match with the condition and in the /wiki/spaces/DCMW/pages/1563166529 to limit the accepted records in a content set.
For example:
You have created a blueprint container for the windows server class, and added a condition location field value must be "Finland". In this case, a data analyst can add servers to the data content plan only if they are located in Finland. And the Audit will give a non-compliant message stating that record does not match with the condition.
To add conditions to a blueprint container, open the Blueprint Container tool menu, select "Add Filters", then define your conditions and select "Save". The condition icon indicates that there is an active condition configured for the blueprint container.
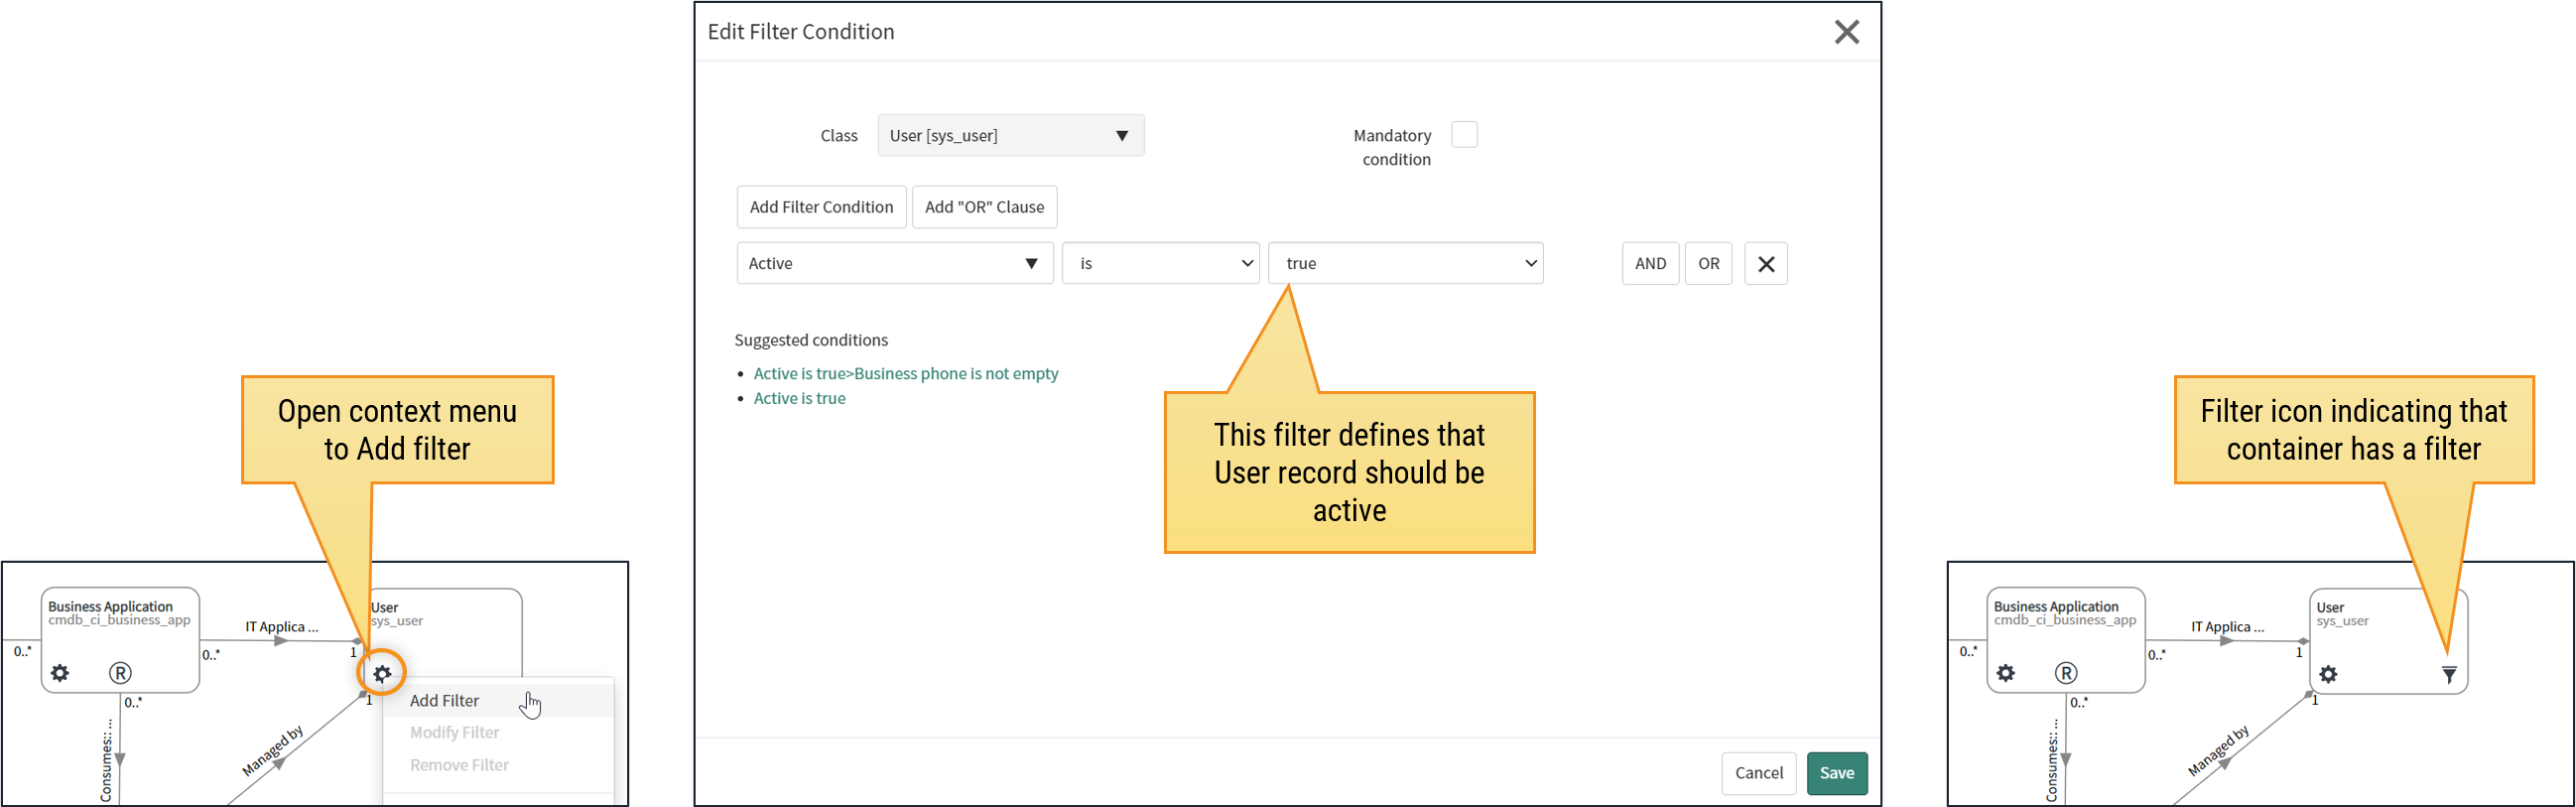
Starting in DCM R3.1 condition can be set as Mandatory. This means that record in that container must match with the condition, or it is considered as non-existent. This can be used for example to define a "People Relationship" record between Configuration Items and Users to have mandatory filter for the relationship type. When you set particular type as mandatory filter, then only relationships matching with the type are accepted and you will get a deviation in the audit for the missing relationship. This people relationship example is pretty similar to CI Relationship which include the Type selection already when defining the m2m relationship in Blueprint Designer. So, this mandatory filter brings the same capability to any other m2m table.
Example below shows two different ways to define a reference between Business Application and a User. The "Business Owner" reference is optional and the "IT Application Owner" reference is mandatory.
- For Business Owner, the audit will first check the reference field on Business Application and then if the User records match with the condition
- This produces two separate audit messages: one for Business Application on the Business Owner reference and another for User record matching the condition or not.
- For IT Application Owner, the filter is applied already when checking the reference, and audit does not include records that do not match the condition
- This produces just one audit message: either Business Application has the IT Application Owner reference or not.
- User record not matching with the condition does not exist from the audit point-of-view.

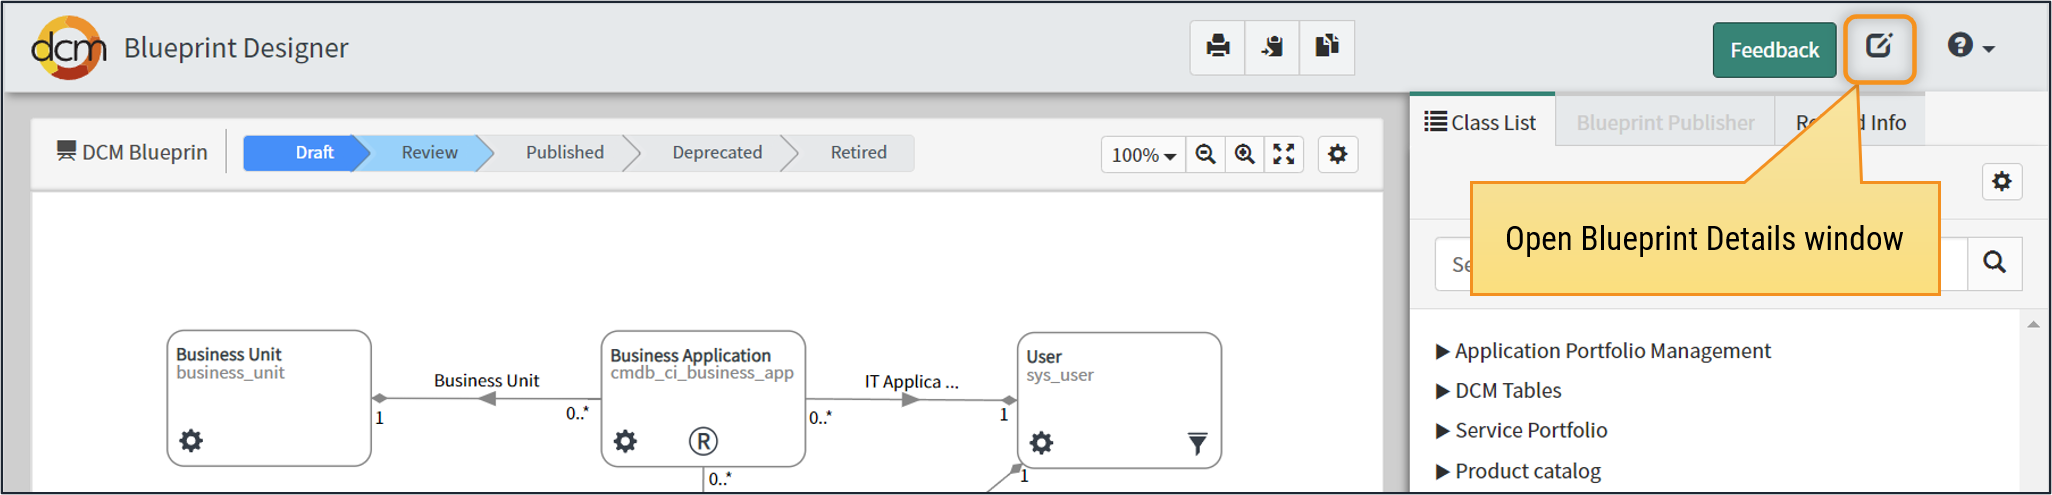
Editing Blueprint details
Blueprints and blueprint versions have certain attributes that can be updated via the "Blueprint details" -form. This view can be opened from the "Edit details" button on the top right corner of the Blueprint Designer.
Blueprint details include attributes like:
- Name
- Description and version description
- Different categorizations and reporting structures like
- Data Domain
- Category
- Implementation phase
- Responsibilities related to blueprint like
- Owner and Architect
- Data management group
Blueprint details can be updated even after the blueprint has been published even though the blueprint itself can't be modified anymore.
Blueprint descriptions
Pay attention to naming and describing your blueprints. Especially the description should tell other people the purpose and usage of the blueprint.
Miscellaneous features in Blueprint Designer
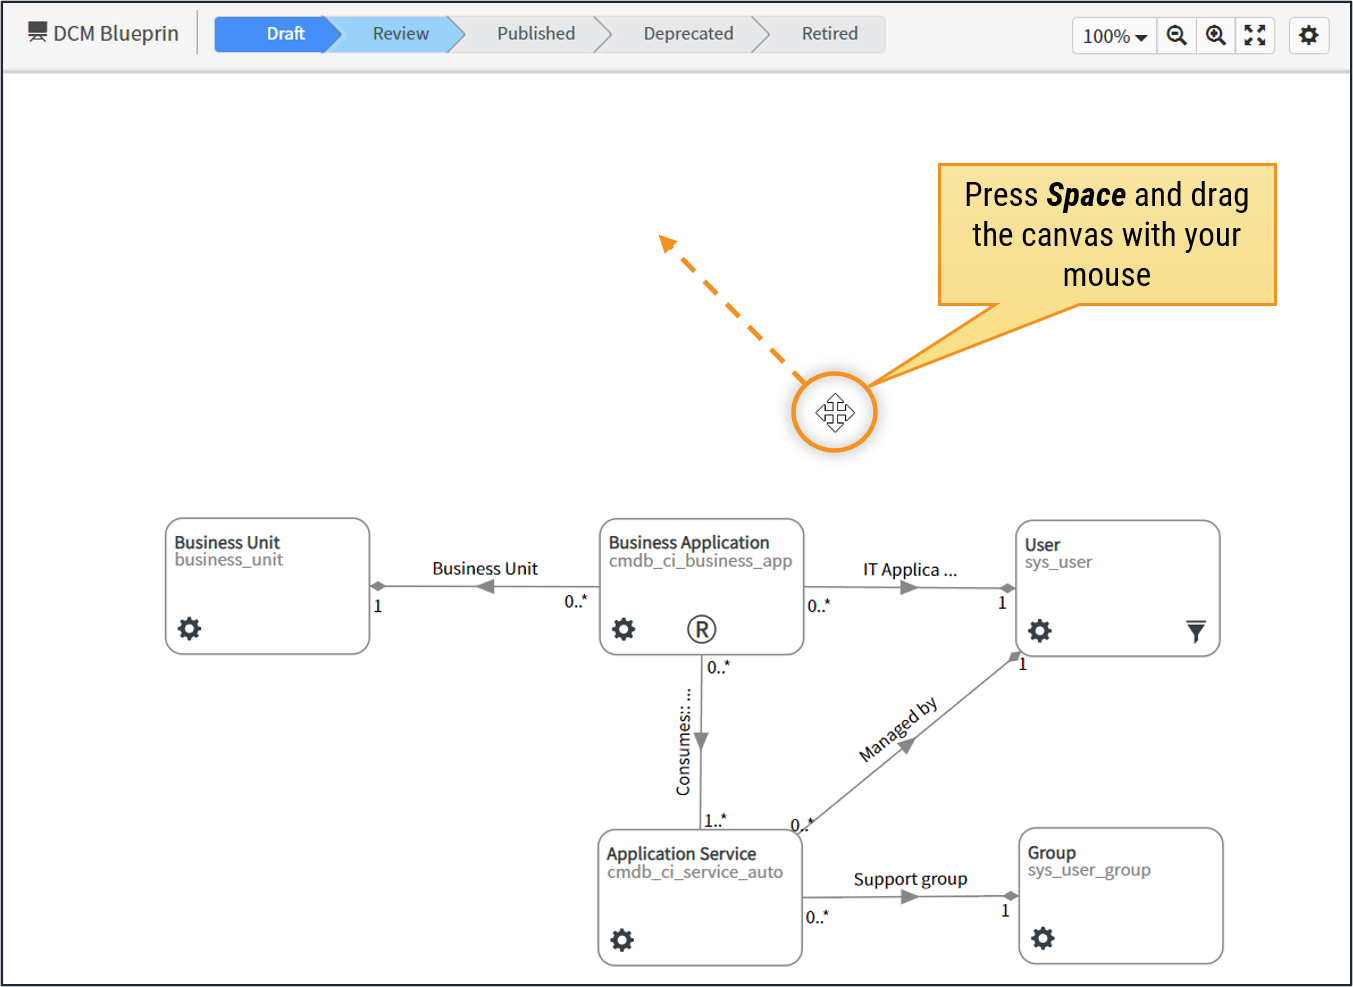
Moving the canvas with mouse
- Users can move the drawing canvas by moving the mouse while holding down the space bar
Field-level conditions and audit
- Blueprint containers can also include "field conditions" for more detailed audit results per field.
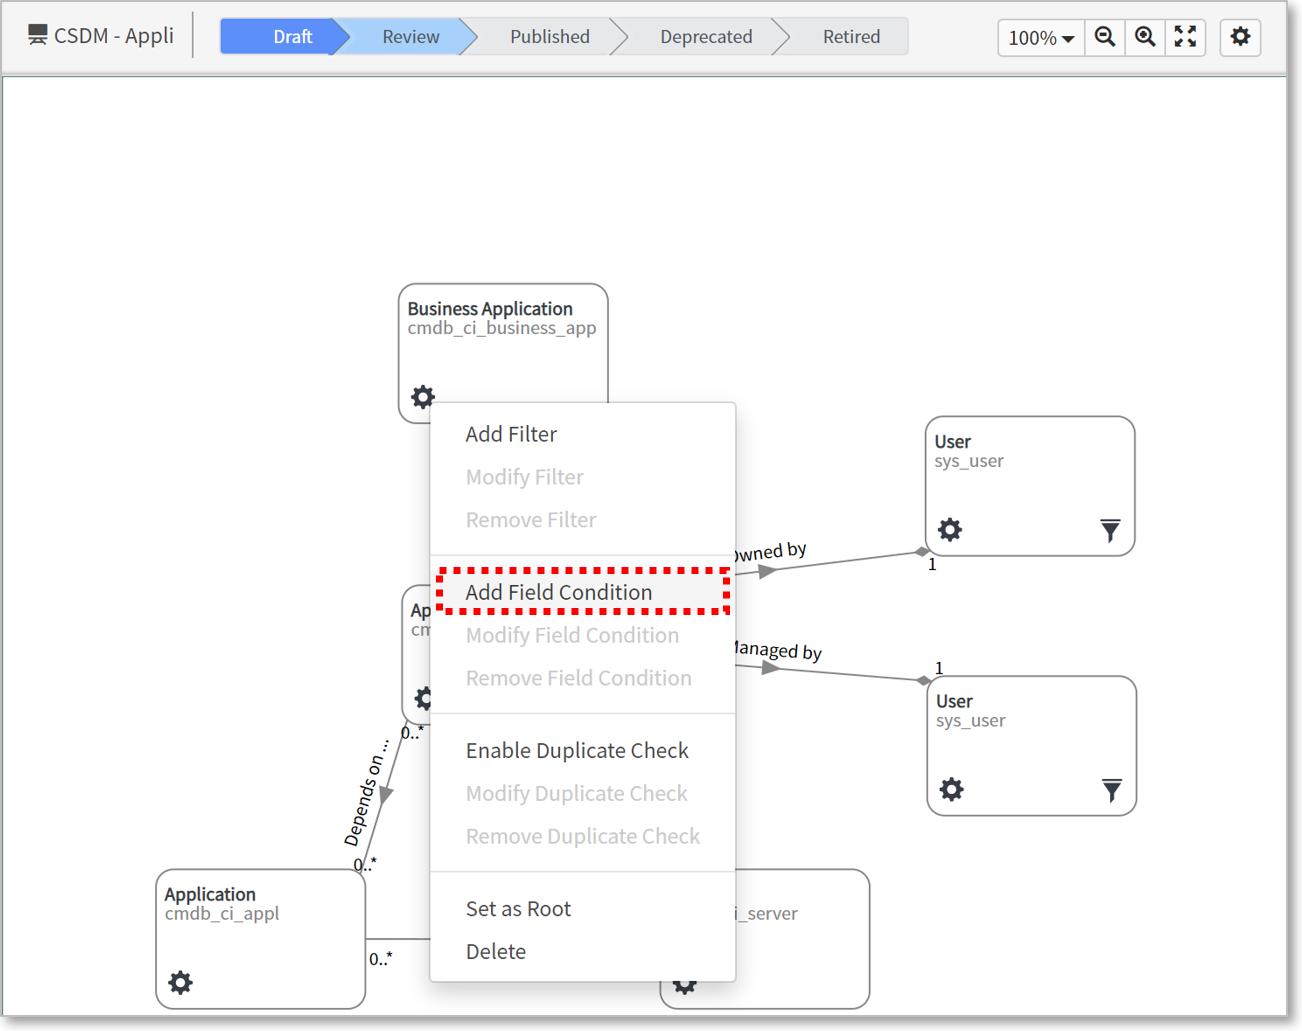
- When adding Field conditions, one must:
- Select from existing Field setups or create a new one
- Define the conditions for each field using a Condition builder
- Parse the conditions into Field configurations
- Adjust Condition Labels (audit messages) when feasible
- Apply changes to enable field setup
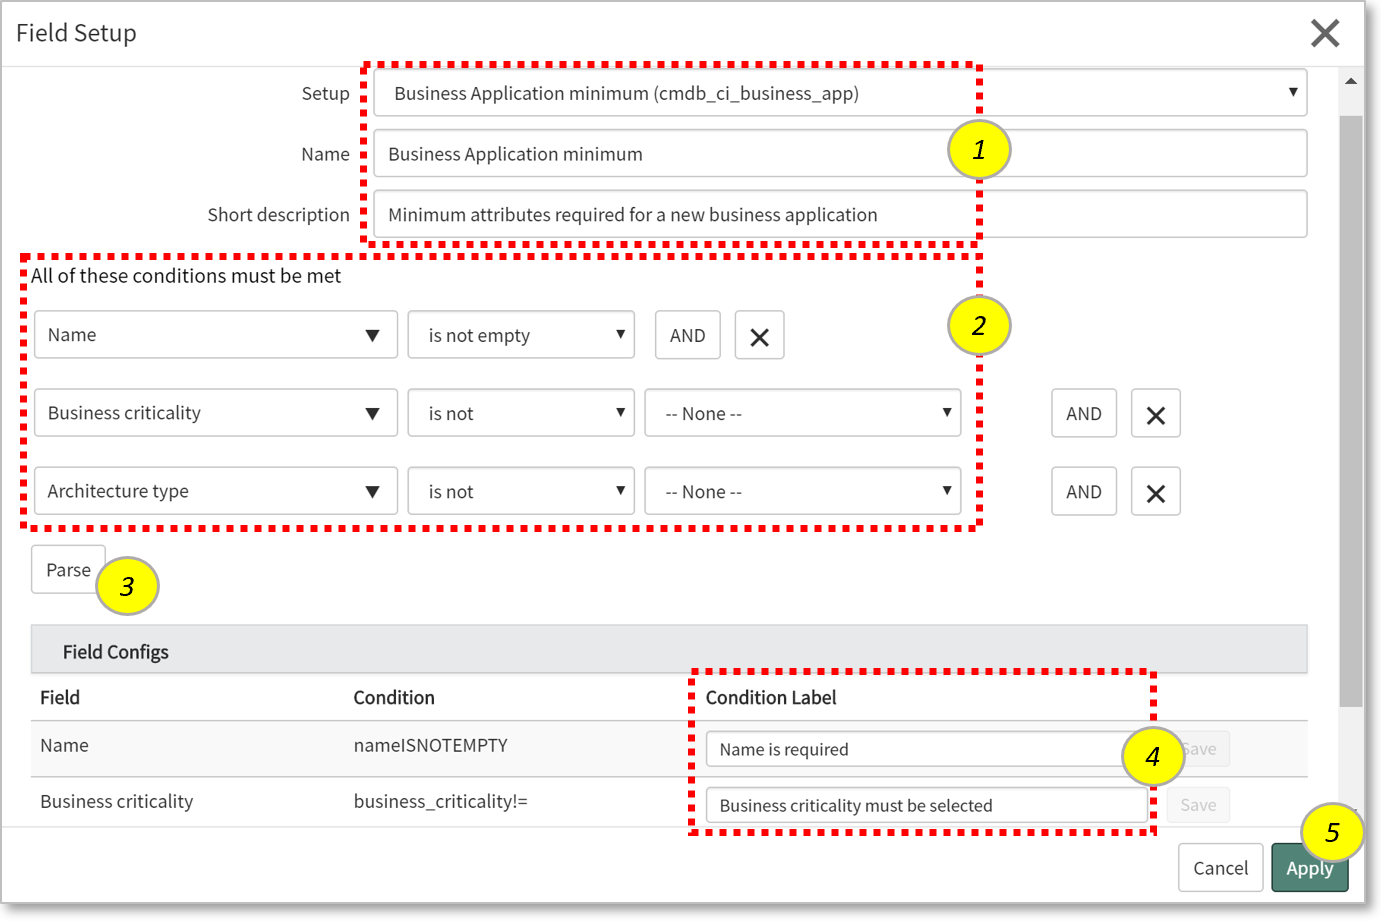
- This field setup will be evaluated when running an audit
- Each condition will be validated and reported separately
- Audit messages created for every non-compliant field
- Compliant message only created for the whole setup (if all fields compliant with the conditions)
Note
Please note that Field-level audits can produce a lot of audit messages.
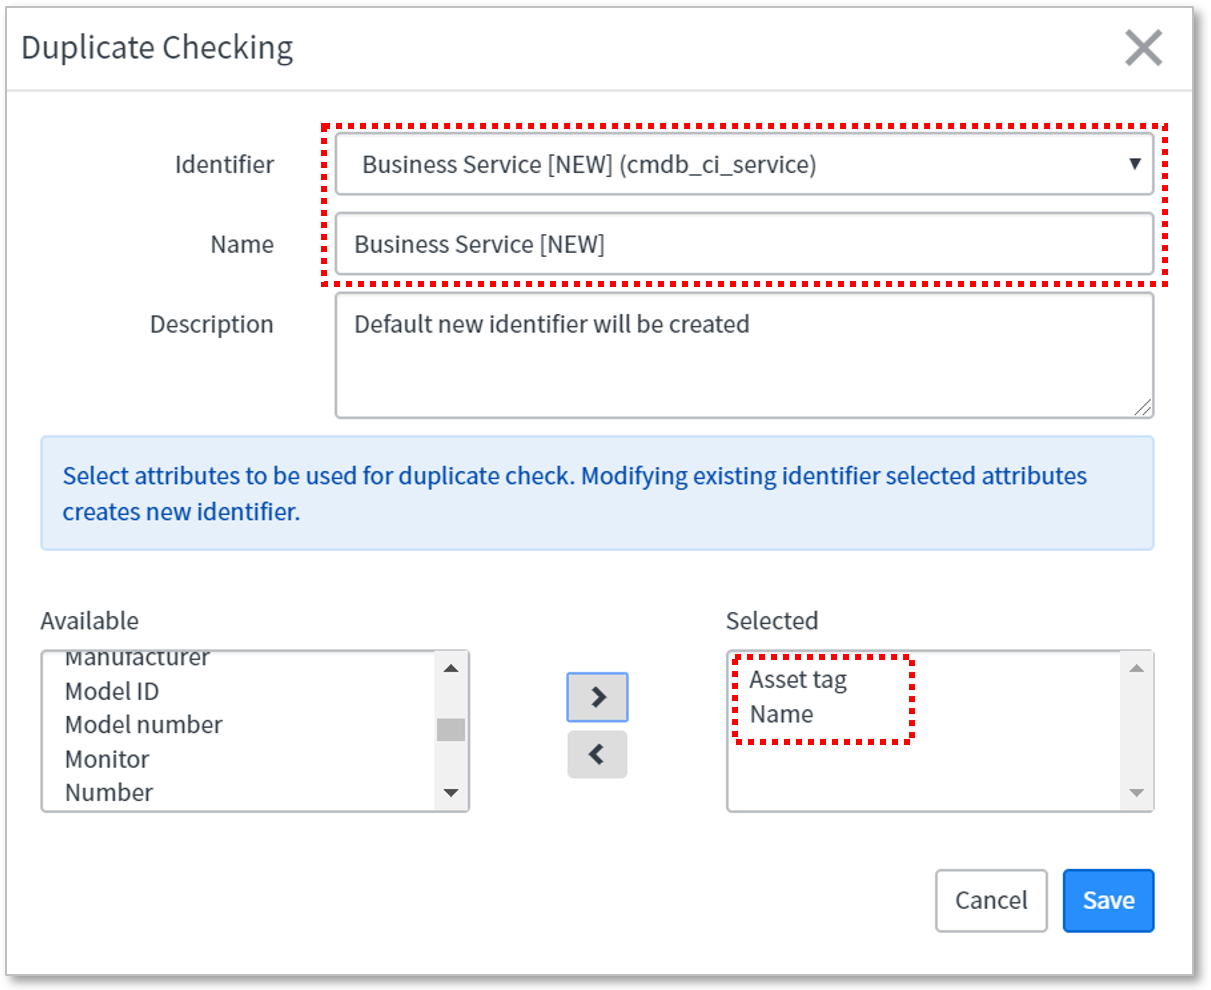
Duplicate checking
- When creating or updating a blueprint, user can enable Duplicate checking for any container used in the blueprint.
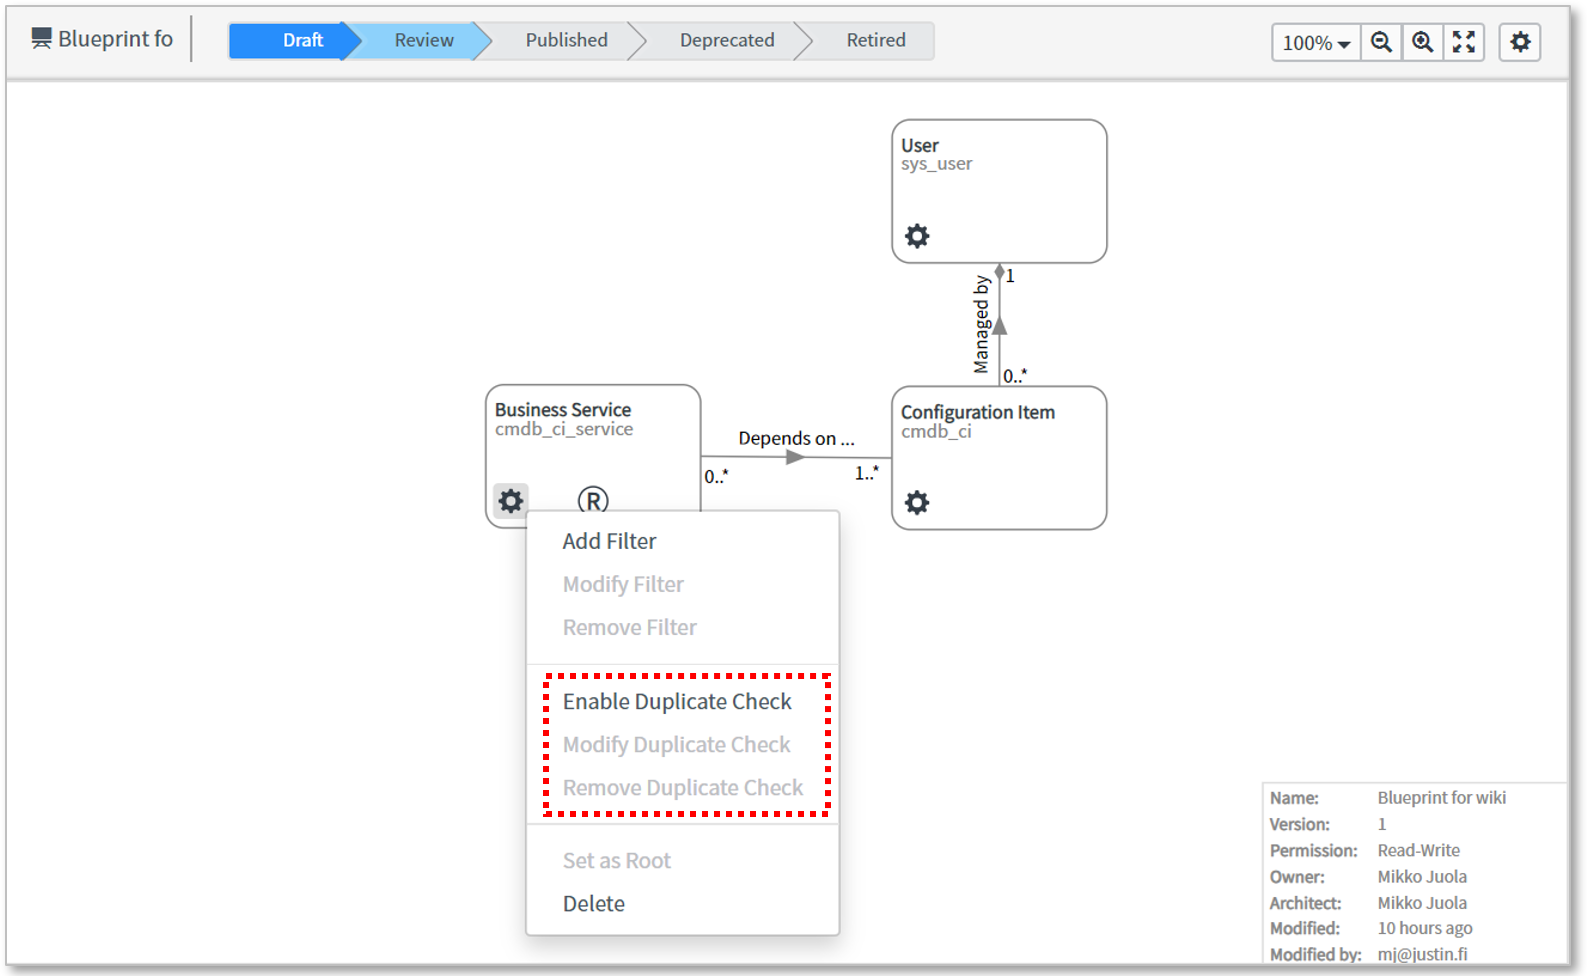
- Duplicate checking requires defining an identifier for the class.
- a class can have multiple identifiers, but a blueprint container must use just one identifier
- The identifier has a name, class, description and a list of attributes that together will make a record unique
Data Provider Config
- When the blueprint version is being published, one can define "how to find the Data Provider" for the audited records
- This definition is basically a path from the root class to a User or Group.
- The default data provider can be selected from many different options related to "data governance structures" like a Manager for a Data Domain or a Tier for example.
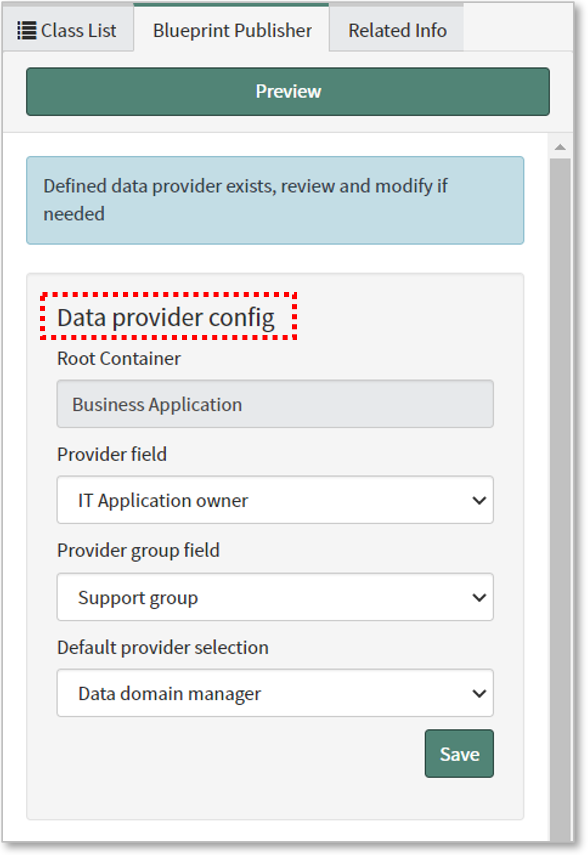
- Once the Data Provider Config is added to a blueprint, the audit results and audit messages will include information about the Data Provider and Data Provider Group.
- This information can be used to filter and group audit results and it's used to show reports on the DCM Data Provider Dashboard.
New
Data Provider Config is available in Blueprint Designer since DCM R5.0.
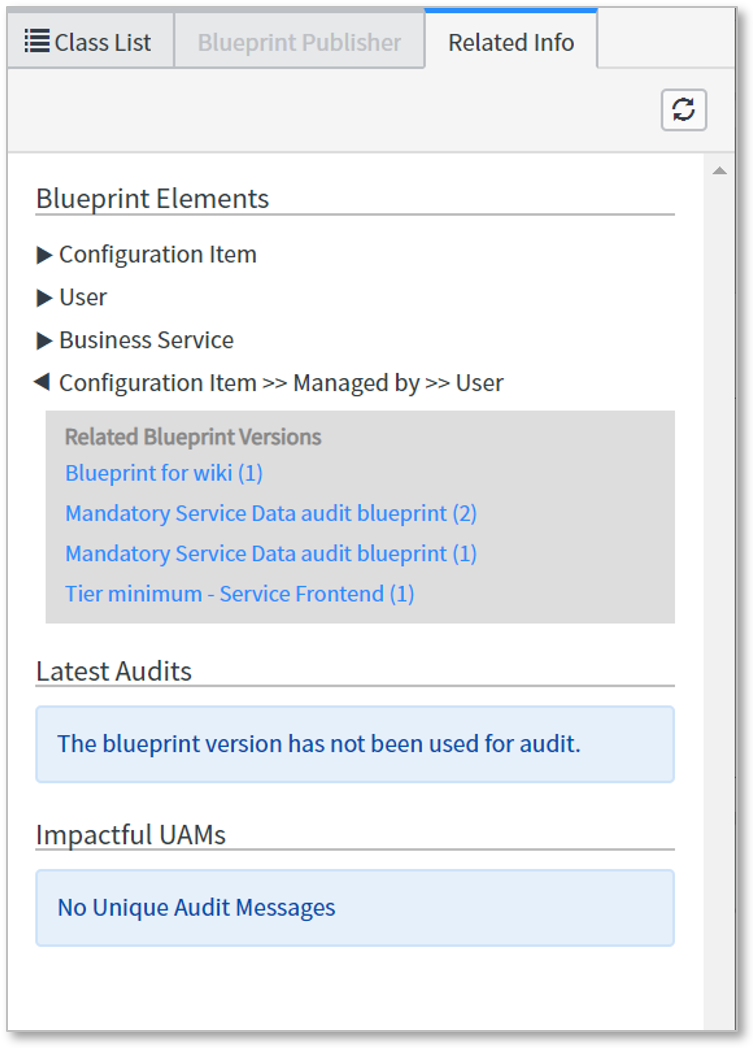
Related info for the Blueprint version
On the side panel of the Blueprint Designer, there is a Related info section that includes interesting information about other related blueprints, audit instances and unique audit messages.
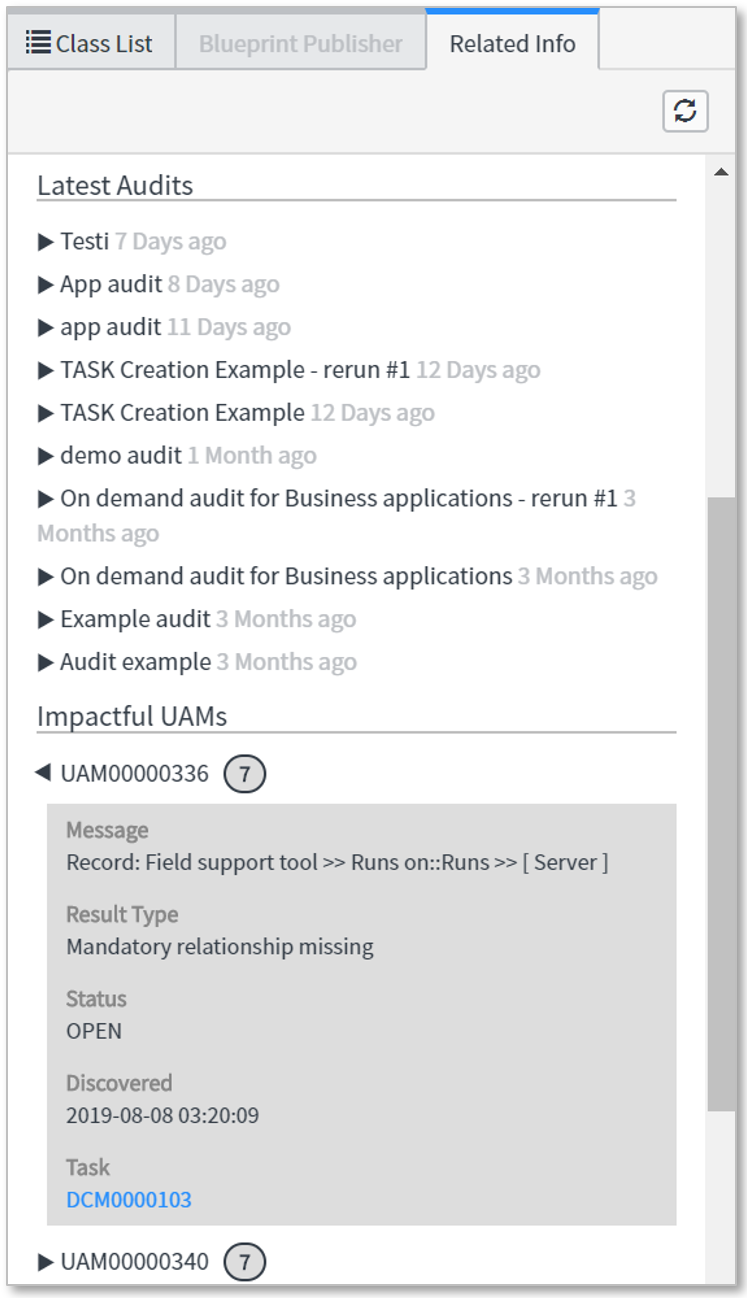
Here are two examples of the Related info tab:
- for a new blueprint that has not been used in any audit yet, but it has Blueprint elements that are also used by other blueprint versions.
- for an already audited blueprint that shows the latest audits (with link to results) and most impactful Unique audit messages based on their weight value.
Blueprint elements
When designing data models with Blueprint Designer, the designer will split the blueprint into "elements" that represent unique parts of the blueprints that may be used in other blueprints as well.
There are two types of elements:
- Containers representing different classes used on blueprints
- Links representing both reference and relationship links used on blueprints
Blueprint elements will give more information about the blueprints to designers, but also new possibilities for showing audit messages. The example below shows one blueprint and its elements.
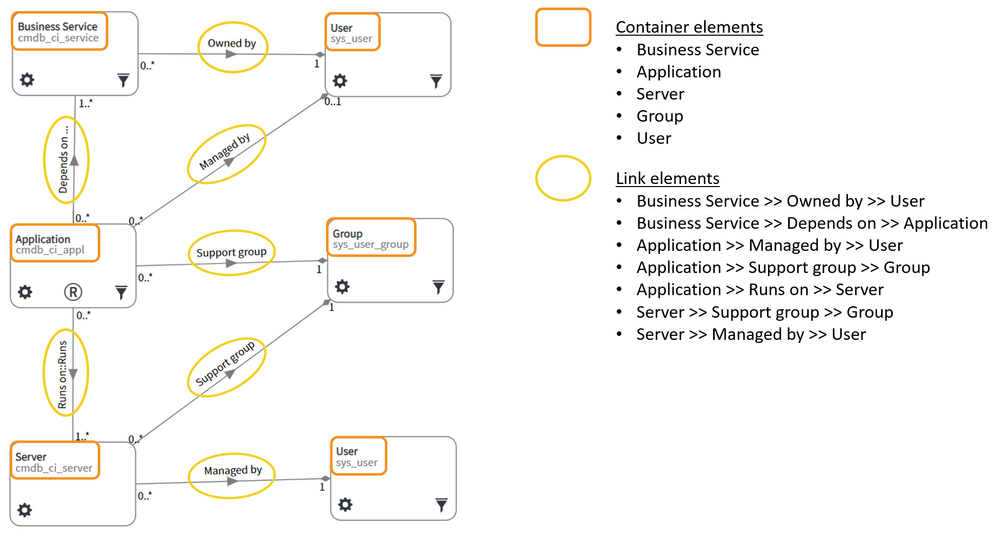
- Note that Blueprint has six containers, but only five container elements since the User class is used twice on the blueprint.
- All links in this blueprint are unique and therefore blueprint has 7 links with matching 7 link elements.
- If another blueprint will include the "User" class, for example, it will use the same blueprint element as this example.
Version management
DCM has automatic version management for blueprints, meaning that each time a new version of the same blueprint is created and published, the application will take care of the version numbering, and guide the user in taking the necessary actions for transitioning the existing data related to the previous versions.
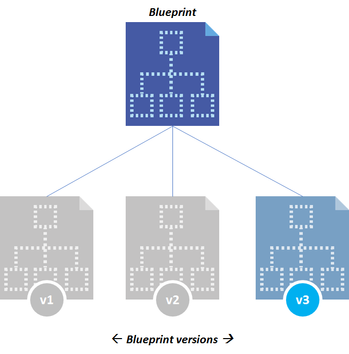
Only one Blueprint version at a time can be in the "Published" state. When a new blueprint has been created and published, DCM automatically turns the status of the previously published blueprints to "Deprecated". Deprecated blueprints can still be used for audits and data content planning, but the status indicates for users that there is a newer version available.
Exporting and Importing Blueprints
Note
Note! Blueprint export feature is coming to Blueprint Designer in DCM 5.2 version.
Sometimes it becomes handy to move blueprints from one instance to another. This can be done with the out-of-the-box XML export and import functionalities. All data related to one blueprint is actually split into several different tables, so follow these instructions to make sure you export and import all the required information.
In general, it's recommended to simply recreate the blueprints into another instance instead of trying to export and import them, but in some cases this procedure is needed.
Good practice
It's recommended to export and import blueprint templates instead of actual blueprints. Remember that you can easily create a template from an existing blueprint version before exporting it.
Exporting Blueprint templates(s)
- Take XML exports out of the following records:
- Blueprints (x_jugr_dcm_bp_blueprint)
- Blueprint Versions (x_jugr_dcm_bp_blueprint_version)
- Blueprint Containers (x_jugr_dcm_bp_container)
- Blueprint Container Relationships (x_jugr_dcm_bp_container_rel)
- Blueprint Container Link Groups (x_jugr_dcm_bp_container_link_group)
- If your blueprint includes "Field Setup", then also export these records:
- Field Setups - used by the exported blueprint versions
- Field Conditions - included in Field Setups
- Field Setup relationships to Blueprint Container
- If your blueprint includes "Class Identifiers", then also export these records:
- Class Identifier - used by the exported blueprint versions
- As DCM Admin go to Blueprint list view
- Search for the Blueprints that you want to export (can take more than one into same export)
- Right-click the list header and select Export → XML
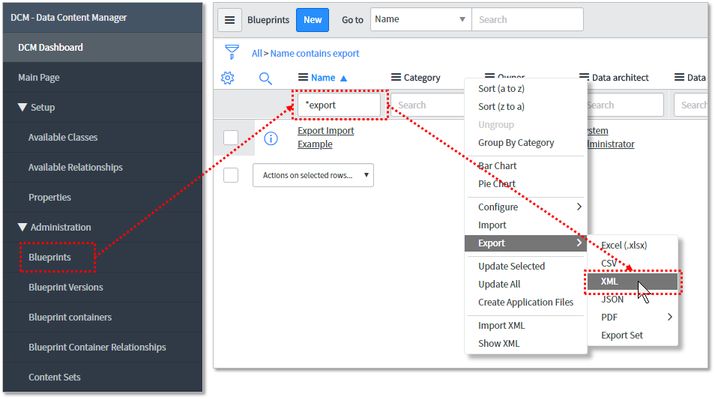
- Save the XML file.
- Now do the same for tables to be exported.
- You can use the "contains" blueprint name as search criteria on each list view to easily get the data related to your blueprint(s).
- Save all the XML files into the same location.
- NOW you should have all XML files ready to be imported into another instance.
Importing Blueprint templates(s)
- And DCM admin go to Blueprints list view
- Right-click the column header and select Import XML
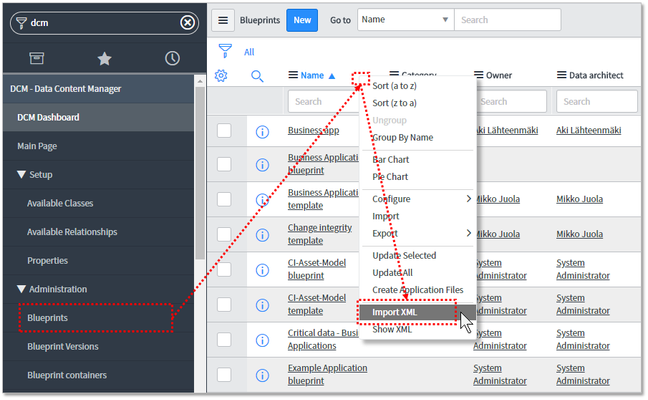
- Select the XML file for blueprints, load, and import
- Do the same for the other XML files
- You can import all files through this same list view. No need to move to a particular list view for importing XML data.
- Once all files are imported, go to DCM Main page
- Open Blueprint library at the bottom
- Search for the imported blueprint template
- Try to open an imported Blueprint template version into Blueprint Designer
- If something is missing compared to the original Blueprint version, please check that you correctly exported and imported data from all four tables.
Importing blueprints templates from an Update set
Some blueprints and especially blueprint templates are shared via this wiki site or datacontentmanager.com as ServiceNow Update Sets.
Follow these steps to import a blueprint template as an update set:
- Here we assume that already have the blueprint as an update set (and XML document)
- Go to your ServiceNow instance
- From the navigation menu, go to System update → Retrieved update sets
- Click Import Update Set from XML
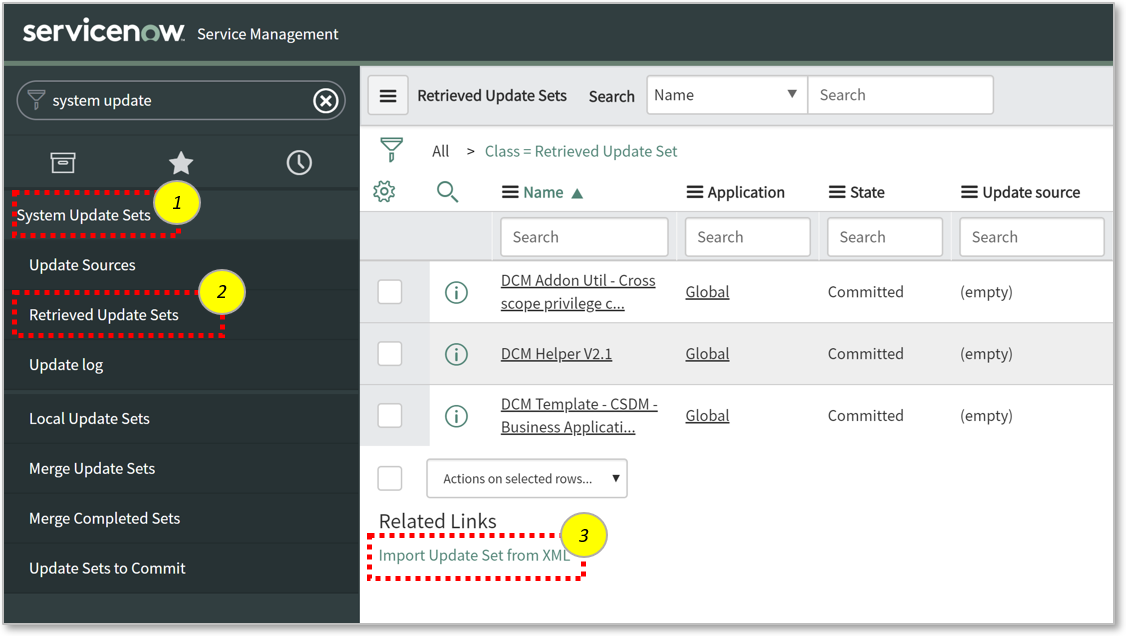
- Once the XML file is imported, open the Update set from the list view
- Click Preview for the Update set
- Click Commit once preview is ready
Now the blueprint template has been imported. Next, we verify that template is working OK.
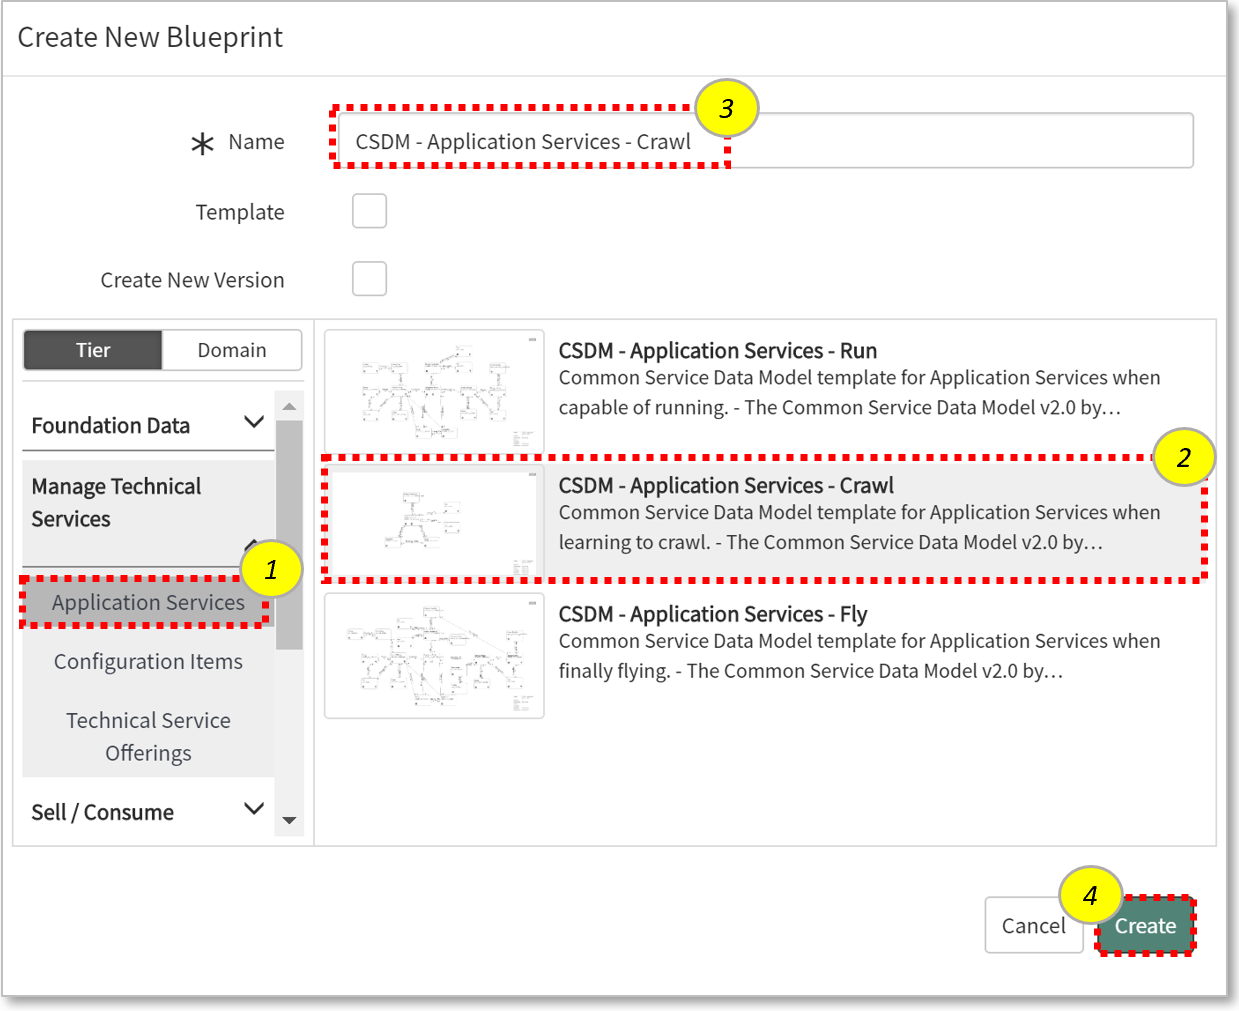
- Start creating a new blueprint
- Select a tier and domain from the left
- Select a template
- Adjust the blueprint name, if needed
- Click Create
- Check that new blueprint includes all elements from the template
Learn more
© Qualdatrix Ltd 2021 | All rights reserved.